❌

Vue lecture

Winhanced brings the Xbox 360 Blades dashboard back

I’ve been raving about Winhanced since I first got my hands on it over a year ago, and the app has only kept hitting stride after stride.

While I haven’t yet covered the major 1.0 update, I wanted to highlight a wild new addition to the launcher, a new interface inspired by the original Xbox 360 dashboard, the one fans famously dubbed "Blades." This update arrives to celebrate Xbox turning 25 years old this past week, a milestone that makes me feel extremely old.

I actually covered something similar in the past, a community project where a fan recreated the Xbox One and Series dashboard in Playnite. I appreciated that project, but I’ve stuck with Winhanced since, largely because of how all-encompassing and easy to use it is. Apparently, I’m not alone in that preference. The addition of a Blades dashboard seemed to make waves online, and I’ve seen plenty of people jump on board and give the launcher a try over the past week or so.

As explained by the developer, the new Blades dashboard works like this: “In Blades, each part of the app (Home, your libraries, Store, Friends, What's New, Settings) is its own blade, and LB/RB flips between them.”

There's much more to Winhanced than nostalgia
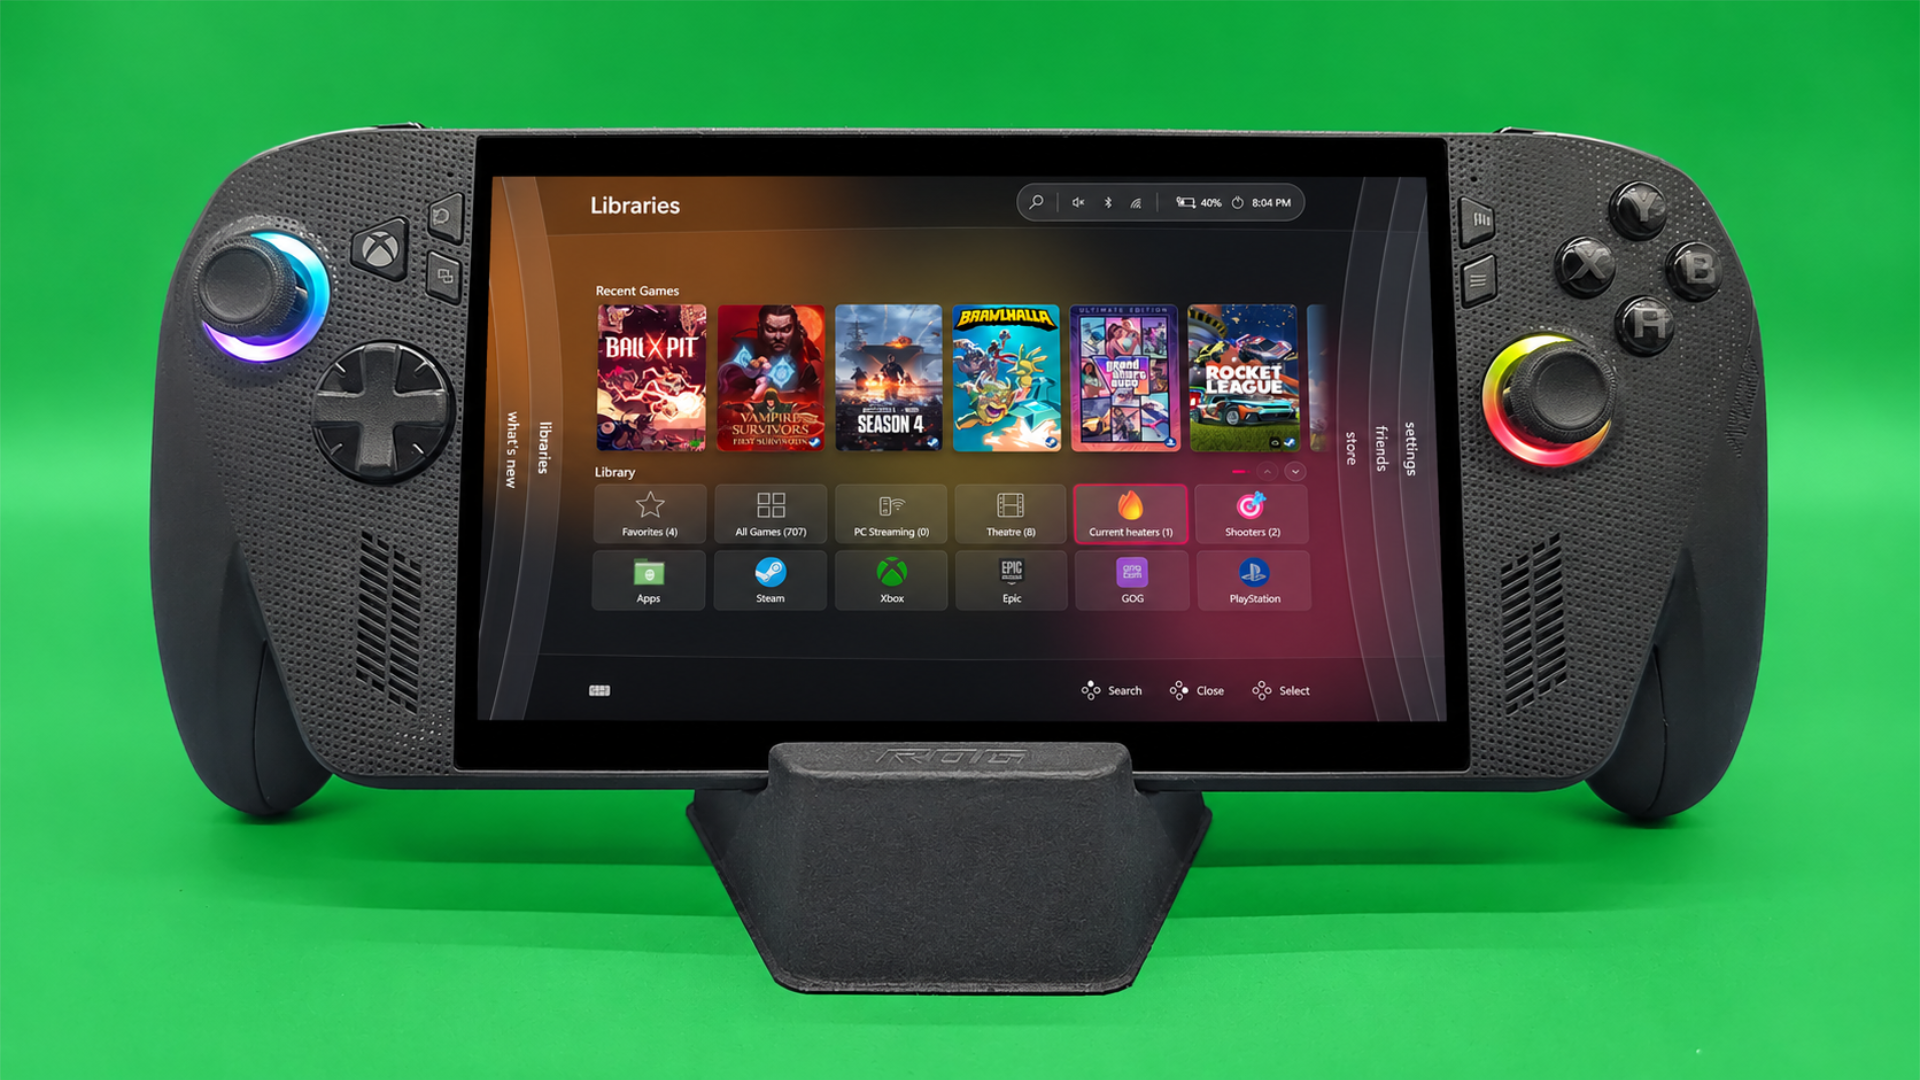
Xbox Ally X handheld displaying Winhanced's Xbox 360-inspired Blades dashboard, featuring recent games and gaming libraries.

Winhanced brings the iconic Xbox 360 Blades dashboard to modern Windows gaming handhelds, including the ROG Xbox Ally X. (Image credit: Winhanced | Windows Central)

I’m honestly impressed by how far Winhanced has come. I couldn’t recommend it enough. I don’t want to touch on 1.0 too much, as it’s worth an entire article in itself, but to give you an idea of just how all-encompassing Winhanced is, it can connect your friends list across almost every platform, offers full Discord integration, includes a store browser that covers Steam, Xbox, and more, supports emulators, tracks achievements, and provides built-in guides for games, among so much more.

If you are interested in trying it, I highly recommend you check it out here. And if you have any questions, the developers are extremely welcoming over in their Discord, which you can join here.

Let me know in the comments if you have tried Winhanced and what you think of the launcher. And be sure to take part in our poll below!

Click to join us on r/WindowsCentral

Join us on Reddit at r/WindowsCentral to share your insights and discuss our latest news, reviews, and more.
  •  

Farcall - Un PC de 1981 qui s'ouvre dans votre terminal

Farcall, c'est un émulateur du tout premier IBM PC (celui de 1981 avec son processeur 8088) que son auteur a codé en Rust pour comprendre comment cette machine fonctionnait vraiment. Et plutôt que de vous le faire compiler en mode barbu des enfers, il l'a tout simplement installé sur un serveur public. Comme ça, vous vous connectez en SSH, et vous atterrissez dans un DOS avec Zork, NetHack, GW-BASIC, Sopwith ou Digger Remastered accessibles dessus.

La commande pour s'y connecter si vous voulez tester, c'est :

ssh [email protected]

Vous arrivez alors sur un lanceur où vous choisissez une disquette à insérer, vous validez avec Entrée, puis vous tapez PLAY à l'invite DOS, et Ctrl-] vous ramène au lanceur. Un client SSH standard suffit, mais les graphismes complets demanderont un terminal qui gère le protocole Kitty graphics, comme Ghostty, Kitty, iTerm2 ou Konsole.

Digger Remastered en couleurs CGA, affiché par Farcall (capture : billet de l'auteur sur dialup.net)

Attention quand même, le DOS du serveur n'est pas celui de Microsoft puisque c'est GLaBIOS et le noyau c'est FreeDOS avec le shell SvarCOM. Et côté jeux, vous avez NetHack dans sa vieille version 2.3e, Zork I, II et III via l'interpréteur Frotz, Sopwith dans son Author's Edition, ou encore GW-BASIC adapté par TK Chia.

Mais le plus sympa, je trouve c'est comment il a construit couche par couche cet ordinateur virtuel. Il est parti d'un simple "Hello World" et a implémenté par itération les instructions du 8088, résolvant les problèmes un par un, pour finir par réussir à lire sa propre disquette PC-DOS 2.0. Mais le vrai challenge, ça a été GLaBIOS, car pour faire tourner un vrai BIOS, il a fallu émuler tout le matériel auquel celui-ci cause comme le contrôleur DMA, le timer PIT et l'interface PPI.

Côté IA, l'auteur précise qu'il a écrit le code de l'émulateur à la main, et qu'il s'est servi de Codex pour les tests unitaires, quelques programmes de test et ses recherches. Le code est sous licence MIT sur son GitHub et vous pouvez compiler ça chez vous avec cargo, puis le lancer sur vos propres images de disquettes avec une ROM de BIOS, en fenêtre ou dans le terminal.

Par contre, ne vous attendez pas à un émulateur de référence fidèle au cycle près... C'est surtout un projet d'apprentissage. Et puis ça ne gère encore ni disque dur, ni EGA, ni VGA. Par contre, le mec ne semble pas vouloir lâcher l'affaire puisque son objectif, c'est le support Windows 3.1, ce qui nécessite avant de supporter le mode protégé du 286. Donc voilà, si vous voulez un vrai PC d'époque, partez plutôt sur MartyPC, DOSBox ou 86Box voire sur un émulateur x86 dans le navigateur si c'est juste pour jouer.

M'enfin, c'est bien cool comme petite plongée dans le rétro-computing !

  •  
❌