Vue normale

Il y a de nouveaux articles disponibles, cliquez pour rafraîchir la page.
À partir d’avant-hierFlux principal

20 Best Ways to Style Your Home Using Vases

6 mai 2024 à 11:45

One of the easiest ways to style your home is with vases, whether it be brimming with fresh, exquisite flowers or serving as ornamental artifacts. Vases lend a beautiful finishing touch to any space. Moreover, these versatile pieces can be showcased in a multitude of ways, be it when artfully grouped on a mantelpiece or a side table or as a captivating centerpiece on a dining table. The best part about incorporating vases is that they seamlessly blend into any room, making it possible to distribute your cherished pieces throughout your entire home.

Designer: Hideaki Miyauchi

Click Here to Buy Now: $39

1. Mantel Décor

Image courtesy of: pro_creator

Creating a beautiful mantel decoration involves arranging an assortment of vases with varying shapes and heights. It is highly recommended to opt for a collection of artisanal, handcrafted ceramic vases that not only serve as an appealing permanent display but are also versatile and can be filled with seasonal blooms, ensuring that the mantel maintains a fresh and attractive look throughout the year.

2. Inside the Niche

Image courtesy of: indigolotos

Image courtesy of: towfiqu98

Craft an eye-catching arrangement in a contemporary living space by adorning the niches with an artisan-crafted ceramic vase in abstract or transparent forms, artistic finishes, and even vibrant hues.

3. Brighten the Entrance Foyer

Image courtesy of: Mint_Images

As the entrance foyer forms the initial space that greets any guests, this space forms the most appropriate place for displaying vases that overflow with fresh flowers. In the entryway, a console table or sideboard becomes a vital inclusion that can be embellished with decorative vases and other artful objects, cherished family photographs, and one can introduce a touch of nature through strategically positioned plants.

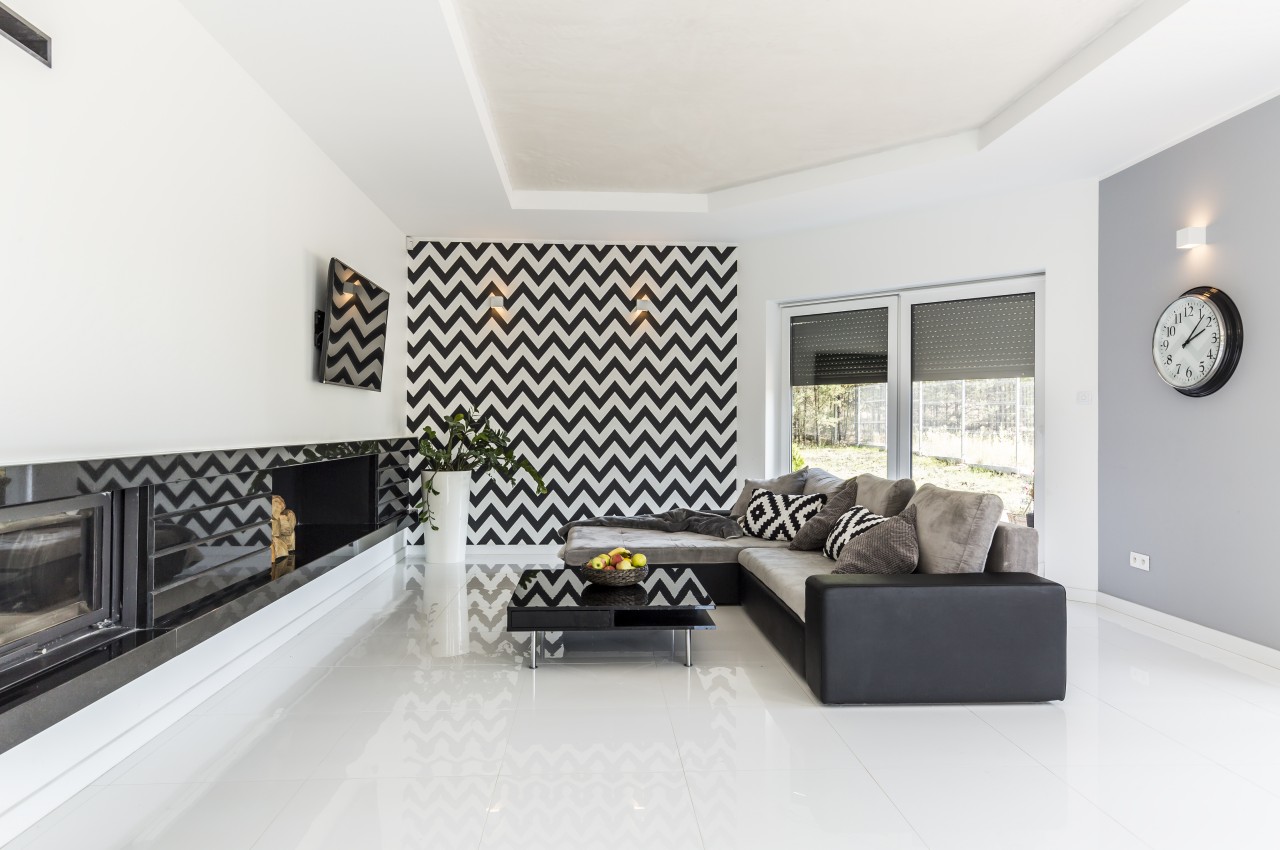
4. Add Volume to Empty Spaces

Image courtesy of: StudioVK

Exceptional vases should be displayed to enhance empty corners by employing a set of two vases, either with similar or contrasting shapes, and filling them with dried flowers. This method not only adds character to the vacant space but also provides volume and an appealing design element.

5. Beautify with Bud Vases

Image courtesy of: Aeril01

Single stems in small vases can be equally as striking as a grand centerpiece and truly highlight the beauty of each bloom. One can employ bud vases for swift and sophisticated table arrangements, ranging from single stems to a combination of petite bouquets. Being lightweight, these vases can be easily relocated when it’s time to serve food, and there’s no need to be concerned about them toppling over due to their size.

6. Create a Centerpiece

Image courtesy of: bluejeanimages

Enhancing a center table or dining table with seasonal blooms or artificial flowers is a delightful way to infuse a room with both color and fragrance. Moreover, they serve as ideal accent pieces to adorn and enhance the interior decor. Note that while it’s always pleasant to have a vase on the dining room table when hosting, one can also adorn the sideboard with a few vases.

7. Colorful Vase Display

Vibrant vases provide an enchanting method to showcase lively blooms, crafting a vivid arrangement while also serving as a practical solution for hiding messy stems.

Image courtesy of: Rawpixel

A cluster of differently-sized and colorful vases creates a pretty display and makes a characterful addition to the interiors.

Image courtesy of: kathkarnowski

To create a breathtaking display, place a collection of them on a windowsill where they will sparkle in the sunlight.

Image courtesy of: annakhomulo

Various vases from the same series, featuring different colors and heights, come together to form an intriguing composition. Their slender necks look elegant but can hold only a limited number of flowers.

8. Arrange Sculptural Vases on the Table

Image courtesy of: svitlini

When curating the interiors with decorative vases, create rhythm and balance by incorporating vases of varying heights. Consider a single-color palette or opt for pieces with captivating sculptural shapes and textures. Alternatively, one can go for pieces from the same family but in different colors for a cohesive look.

9. A Tall Vessel for Artistic Branches

Image courtesy of: timofeevavalentina_foto

When enhancing your indoor spaces one can effortlessly craft a captivating sculptural centerpiece using just a few leafy branches. In this example, the tall vase has an earthy vibe and it is complemented with wheat spikelets.

10. Playful Pieces

Image courtesy of: natanavo

Vibrant hand-painted or unique-shaped vases form a beautiful display on the mantel, shelf, or side table. One can mix and match vases in various styles and materials to create an eye-catching arrangement. Whimsical vases can add a cheerful and playful touch to any interior making it a characterful addition.

11. Pair Vases with Different Heights

Image courtesy of: voronaman111

Go for floor vases in different heights just as in this image. For the spring and summer season, go for ceramics in nature-inspired textures and soothing tones like shades of blue or cream. Additionally, one can mix and match designs of different heights as the tall and short pieces impart a visually pleasing look.

12. On the Bedside Table

Image courtesy of: alinabuphoto

In this bedroom with a minimalist aesthetic, the bedside table incorporates a vase and transforms into a warm and inviting space.

13. On the Open Shelves

Image courtesy of: mariiaplosh

Enhance your open shelf with wall-color-matching vases by placing a vase on a lower shelf to add color and vibrancy to the interiors. For a longer-lasting arrangement, choose dried flowers, especially if the room lacks natural light. Hence one does not have to hide flower vases in a utility cabinet and can display them on open shelves or in a glass-fronted cabinet for an appealing and easily accessible presentation.

14. Add Tactility

Image courtesy of: liudmilas

These vases feature a three-dimensional pattern on their surfaces, introducing a tactile element to the interior decor. The timeless turquoise blue in a three-dimensional Criss cross design when paired with vibrant green plants, breathes life into the space.

15. Hanging Vases

Image courtesy of: Dimaberlin

Enhance your wall with multicolored hanging planters, creating a form of wall art that’s ideal for empty walls, adding character to them. The earthy hues of these planters can complement the decor, especially if it follows a nature-inspired color palette.

16. Add Pattern

Image courtesy of: kostiuchenko

The lively vase incorporates a design that adds visual appeal to a neutral environment. Make sure it complements the interior’s color palette to craft an energizing presentation. Unfilled vases can form striking arrangements, particularly when they boast charming hues, intricate sculptural shapes, and captivating textures.

17. Introduce Biophilia

Image courtesy of: Olesya22

This vase brings a touch of biophilia into the interior by incorporating vein-shaped patterns and a tactile quality on the golden vase. Leaf fronds further enhance the overall aesthetic.

Image courtesy of: avanti_photo

Just see how these vases, with assorted leaf-shaped designs and sizes, also imbue the interior with a biophilic atmosphere.

18. Infuse Tactility

Image courtesy of: oleksandrsh

Vases can introduce a tactile dimension to the interior, as seen here with the textured appearance of three distinct vase designs. While they exhibit variation, they share a common design theme.

19. Dual Color Vase

Image courtesy of: stockfilmstudio

A two-toned vase introduces color to the decor while harmonizing with the color scheme.

20. Metal Vase

Image courtesy of: ammarant

A metal vase not only adds a touch of luxury to the decor but can also function as a decorative object, and by adding branches, you can ensure they remain upright in tall vases.

These ideas will surely help you decorate your home with flower vases, a timeless decor accessory that has remained fashionable for centuries. Whether you’re aiming for a sleek and modern setup or a vintage one, you’ll always find a vase to match your personal style.

The post 20 Best Ways to Style Your Home Using Vases first appeared on Yanko Design.

Top Ten Wallpaper Installation Mistakes To Avoid

3 mai 2024 à 11:40

Wallpaper serves both aesthetic and functional purposes, it not only creates a focal point but also adds color, texture, and pattern to the room décor. When designing any space, wallpapers are a popular and versatile way to decorate and add value to the interiors but avoiding errors is key. Therefore, it is important to measure accurately, handle the wallpaper carefully, and allow proper drying time for flawless results. Classic patterns like stripes or florals suit traditional settings, while geometric or abstract designs lend a modern touch. With a wide range of colors, patterns, and textures, wallpaper can suit any style and can simultaneously conceal the imperfections on the walls.

Image courtesy of: bialasiewicz

During the installation of wallpaper, make sure to handle the wallpaper carefully to avoid any form of damage. Note that mishandling can lead to tears, creases, or other unsightly damage. Use clean, dry hands and gently unroll and unfold the wallpaper. Be cautious of liquids near the wallpaper and avoid excessive stretching or pulling to maintain pattern integrity.

Image courtesy of: pro_creator

Here are several common mistakes that occur during wallpaper installation.

Mistake No. 1: Avoid Papering Over Old Wallpaper

Image courtesy of: olgar23

It is crucial to remove the old wallpaper before any new application. Moisture from the new wallpaper’s backing could reactivate the adhesive of the original, resulting in bubbling those damages both layers. To avoid this, rent a chemical or power steamer to strip away the existing wallpaper, readily available at local hardware, paint, and home improvement stores.

Mistake No. 2: Not Choosing the Right Wallpaper Material

Image courtesy of: pro_creator

Image courtesy of: KarinaBost

Each wallpaper type has its ideal setting, as not all wallpapers are suitable for every location. For example, natural wallpapers like grasscloth are not water-repellent, making them susceptible to damage in high-humidity areas like kitchens and bathrooms or fading in direct sunlight. Additionally, it is important to safeguard wallpaper from heat sources like ranges or fireplaces and research the best wallcovering for each specific environment to prevent damage. The different types of wallpaper materials include metallic, vinyl, paper-backed fabrics like silk and linen, hand-painted wallpaper, and grasscloth wallpaper. Choose the one that is best suited for your home or any other area of application.

Mistake No. 3: Wrong Scale and Print of Design

Image courtesy of: Raul_Mellado

When choosing wallpaper, consider the size of the prints carefully. Small prints work well in small spaces, providing a smart look without overwhelming. Conversely, larger spaces benefit from larger-scale patterns, as small patterns may impart a pixelated look and blend into the background. After the installation of the wallpaper, retaining leftover wallpaper pieces is crucial for repairing any damages that may occur. Make sure to keep the extra pieces for future repairs, as finding exact matches later can be tricky.

Mistake No. 4: Ordering Less Quantity of Wallpaper

Image courtesy of: FollowTheFlowStudio

Accurate measuring and planning before wallpaper installation is crucial for purchasing the right amount. Despite the high cost per foot, there’s a tendency to order only the minimum needed. Underestimating the quantity of wallpaper often leads to delays and potential color mismatches, especially with hand-painted or printed patterns. Prioritize precise measurements of wall dimensions, considering pattern matching and trimming.

Image courtesy of: hemul75

Pro Tip: Another mistake is purchasing wallpaper rolls before measuring the walls, leading to overspending or acquiring insufficient quantities. Therefore, it is important to measure the wall beforehand to ensure the correct size is used and to streamline the process. Note that the more the number of doors and windows, more is the wastage especially if the wallpaper has a patterned design.

Mistake No. 5: Unmatched Seams

Image courtesy of: pro_creator

Misaligned seams are a common wallpaper installation issue, often caused by factors like incorrect adhesive usage or inadequate leveling of the first panel. To avoid this eyesore, prioritize arranging straight, even seams during installation for a polished, professional finish. Additionally, choosing the right wallpaper adhesive is crucial for a smooth installation. Different types of wallpaper require different pastes, so follow the manufacturer’s recommendations. Using the appropriate adhesive ensures proper adhesion and prevents issues like peeling or bubbling. It is important to invest time in precise alignment, utilize tools like plumb lines for straight application, and ensure seams are tightly joined for a flawless finish.

Mistake No. 6: Installation on Damaged Walls

Image courtesy of: MandriaPix77

Before installation of wallpaper, inspect the wall for damage or moisture issues and fix any problems beforehand to ensure a durable and flawless installation. Defects like cracks, peeling paint, damp areas, and patching holes need to be addressed and they should be allowed to cure fully before smoothing with sanding if needed. Make sure to rectify sources like leaks or mildew before proceeding with installation. Prioritize surface preparation before wallpaper installation. Don’t overlook cleaning, especially for textured walls, which may require scraping for smoothness.

Mistake No. 7: Assuming Wallpaper Adheres to All Wall Surfaces

Image courtesy of: bialasiewicz

Assuming wallpaper sticks to all wall surfaces is a common mistake. Textured walls like orange peel or popcorn should be avoided or prepared for installation by grinding, sanding, and priming. Note that primer is essential not only before wallpapering but also before painting to prevent wallpaper from peeling off poorly painted walls.

Mistake No. 8: Going the DIY Way

Image courtesy of: ShintarTatsiana

While many mistakes occur during wallpaper installation, it’s not an area to cut corners. Amateur installation can lead to costly errors and premature replacement. Even peel-and-stick wallpaper isn’t foolproof. To avoid DIY mishaps, designers recommend hiring experienced professionals for proper wall preparation, precise measurements, and steady installation. Try to rely on professionals for a flawless result, emphasizing the investment in quantity and expertise required for satisfactory outcomes.

Tip: If opting for a DIY approach, prioritize cleanliness and dust prevention for a seamless installation. Invest in proper equipment and adhere to organized schedules to minimize dust settling, avoiding compromised adhesion. Practice careful handling and ensure clean hands to prevent marks on the wallpaper.

Mistake No. 9: Presence of Air Bubbles

Image courtesy of: DC_Studio

Bubbling in wallpaper, caused by trapped air pockets or poor adhesion, is a common issue. To remove bubbles, locate and cut an opening, inject adhesive, and flatten with a smoothing tool. Prevent bubbling by using high-quality wallpaper, applying it carefully, and using a wallpaper primer for a smooth surface. Promptly addressing bubbles and taking preventive measures can maintain a smooth finish.

Image courtesy of: bialasiewicz

Tip: For smooth wallpaper application and prevention of air bubbles, start smoothing from the center outward, and if bubbles appear after drying, moisten the area and puncture the bubble to release air.

Mistake No. 10: Not Cleaning Wallpaper After Installation

Image courtesy of: Vladdeep

Once the wallpaper is applied, make it a point to promptly inspect and clean any areas with excess paste residue to prevent shiny spots. Use a clean bucket with fresh water and a damp sponge to wipe down the wallpaper immediately after completion. It’s essential to consult the wallpaper label for specific instructions on smoothing and cleaning based on the type of finish.

Image courtesy of: pro_creator

In conclusion, installing wallpaper requires careful attention and time, and rushing the process can lead to errors. Ensure accurate alignment, trimming, and adherence to manufacturer’s instructions. Avoid common mistakes like inadequate wall preparation and mishandling. With precision and quality materials, one can achieve a seamless and attractive result that reflects your taste and style.

The post Top Ten Wallpaper Installation Mistakes To Avoid first appeared on Yanko Design.

Top Ten Ways to Give a Stylish Makeover to Your Existing Kitchen

26 avril 2024 à 11:40

The kitchen is not only a space for cooking but it has evolved into a space for family bonding as well as an interactive space during social gatherings. Just like we pay attention to the décor of the living room and bedroom, it is advisable to enhance the overall look of the kitchen. Since it is not practical to dismantle an existing kitchen, here are some smart and easy ways to enhance the overall look of the kitchen without completely replacing it.

Designer: MAGPIE

1. Paint the Kitchen Cabinets

Image courtesy of: FollowTheFlowStudio

Painting the cabinets can enhance the look of the kitchen at a fraction of the cost. When deciding on the color of the kitchen cabinets, make sure that the cabinets match with color of the countertop and the walls. Opt for glossy or matte finish paint on the cabinets and replace old knobs and handles with new ones as it is one of the easiest ways to upgrade the look of the kitchen cabinets.

2. Install Designer Tiles

Image courtesy of: FollowTheFlowStudio

The kitchen backsplash can transform into a beautiful canvas for introducing color and pattern into your kitchen décor. Tiles come in a variety of styles, colors, and textures, and have the ability to completely transform the appearance of any kitchen just like in this example above. The geometric tile patterns in hues of white, black, and grey combine with the all-white cabinetry to elevate the overall look of the kitchen and impart a modern look to the interiors.

3. Introduce Dual Tones

Image courtesy of: vanitjan

Break away from the conventional, monochromatic color scheme like whites, off-whites, and browns that are found in most kitchens. Instead, consider incorporating a bold, contrasting color or a vibrant shade to infuse a sense of joy into your kitchen’s design. One effective approach to achieve this is by incorporating dual tones, like the bold color combination of tomato red and dark grey overhead and base cabinets of this contemporary kitchen design.

4. Accessorize the Kitchen

One can enhance the overall ambiance of the kitchen by incorporating decorative cookware that is not only functional but also serves as stylish accessories. Some of the most commonly used items that can make a statement include colanders, platters, pots, pans, ladles, and dishes. They effortlessly form a vibrant and eye-catching display with their various shapes, sizes, and colors. Make it a point to keep the counters clean and clutter-free as cluttered surfaces pull down the look of the kitchen.

Designer: Ernest Perera

Dish racks not only hold plates, utensils, and glassware but also serve a dual role by facilitating the drying process via effective water drainage. The Aurea drying racks are crafted from “stratify wood,” and they resemble wooden cutouts that can be used for accommodating plates, openings for wine bottles, and raised sections for cups.

Designer: Gianluca Soldi for SoldiDesign

The Ovetto wastebin is designed by Gianluca Soldi for SoldiDesign while this egg-shaped waste and recycling bin is named after the Italian word for egg and it features an artistic and functional design. The bin includes three compartments for easy waste and recyclable sorting. In this bin, users can simply push one of the three circular hatches to dispose of their waste, and when it’s full, the sides can be opened for removal. Another interesting feature is that the bin has a concealed integrated bottle crusher on top, while its curved shell gives it an elegant sculptural appearance that makes it a decorative statement piece when not in use.

5. Layered Lighting

Image courtesy of: anontae2522

One of the easiest ways to upgrade the look of the kitchen is by designing the space with a layered lighting scheme. This includes ambient lighting for the overall illumination of the space, and task lighting, such as under-cabinet lighting or chimney lighting, which provides focused illumination for food preparation. One can replace ordinary pendant lights with decorative pendant lights in the kitchen or install statement lights above the kitchen island. Also LED lights can be used to illuminate the cabinets.

6. Introduce a Green Thumb

Introduce color and create an artistic kitchen space by hanging planters to showcase your greens or simply grow microgreens. This arrangement not only looks good but also provides organic food for the family while a fresh bouquet of flowers is also an interesting way to elevate the look of the kitchen.

Designer: Tilden Cooper (Assoc. AIA)

Nutraponics is an automated hydroponics system, that functions as a self-sustaining indoor garden that uses water-based solutions instead of soil. This innovative device simplifies plant care by managing growth and monitoring the crops. It combines various technologies, like the balanced light spectrum of the Grow Ring and an electronically controlled water pump, which delivers nutrient-rich water to plant roots through a patented water distribution panel, ensuring plants receive the necessary nourishment as and when required promoting efficient and heat-free growth.

7. Introduce Built-in Appliances

Image courtesy of: pro_creator

Upgrade the overall look of the kitchen and give it a clutter-free appearance with built-in appliances as they work as ergonomic space savers that ensure easy maintenance and create an organized and efficient workspace. Concealing appliances behind closed doors adds sophistication and gives the look of bespoke furniture with a seamless look. However, make sure that the cabinet finishes the match with the appliance fronts. Additionally, one can incorporate the range hood into custom cabinetry to complement the overall kitchen design.

Designer: Alperen Çağdaş

The HIDE is a sleek built-in oven with a hidden interface panel that functions as a hidden handle. This appliance combines the convenience of modern automatic doors, which seamlessly integrates with the kitchen aesthetics.

Designer: Samsung

Samsung has ventured into the Bespoke line that aims to enhance consumers’ lives through innovative design collaborations with artists and designers. The brand actively promotes global participation and recognizes the power of collaboration. Samsung’s Bespoke concept empowers customers to create designs that reflect their unique personality, transforming it into a creative partnership that fosters self-expression for both artists and consumers.

8. Create a Sitting Area

Image courtesy of: bialasiewicz

In an open-style kitchen, one can improve the functionality of the kitchen by introducing a cozy breakfast counter with head-turning stools. This is a functional addition that not only provides extra seating but also serves as an interesting design statement.

9. Upgrade the Sink

The choice of sink material and the design of the faucets can immediately enhance the look of the kitchen and one can choose from options such as stainless steel, enamel-coated, fire clay, or granite sinks.

Designer: Shubh Wadel

The Grifo-A Sliding Faucet is an innovative faucet that is designed to tackle the challenges associated with conventional dishwashing methods. The faucet reimagines the sink’s functionality, reducing water wastage, introducing height-adjustable sink options, simplifying and expediting procedures, and implementing an efficient leftover food disposal system.

10. Install a Kitchen Island

A kitchen island helps create an extra countertop, that helps in creating a clutter-free space for cooking, and entertaining, and enhancing the overall look of the area.

Designer: Falper

The Falper’s Small Living Kitchens aims to revolutionize the kitchen experience in compact homes. It features kitchen islands that are meticulously crafted to impart a sense of spaciousness and luxury to even the tiniest kitchen spaces. The Small Living Kitchen makes a statement and seamlessly integrates into a variety of home settings, from apartments to houses. These tips will surely help you to upgrade the overall look of your kitchen like a pro.

The post Top Ten Ways to Give a Stylish Makeover to Your Existing Kitchen first appeared on Yanko Design.

❌
❌