Vue normale

Il y a de nouveaux articles disponibles, cliquez pour rafraîchir la page.
À partir d’avant-hierYanko Design

This pocket-sized cyberdesk built inside Altoids Tin is a portable workstation for geeks

Par : Gaurav Sood
12 mai 2026 à 15:20

What do you do with your Altoids tins after devouring the mints? Maybe for keeping your coins, hand it over to your mom for storing the sewing accessories, for keeping handy a first aid, or perhaps keep the watercolor paint for your little niece. DIYer “Exercising Ingenuity,” however, has a very unique use for the aluminium container.

The inventive YouTuber wanted to build a fully functional Cyberdesk inside of the Altoids tin. Sounds bizarre? Surely it is, given the size of the thing. In his video, he asked himself, “That looks like a tiny computer?” It was clear from the outset that the assembly would require the utmost level of detail and sourcing all the hardware inside the tiny housing. While it might not be the most powerful machine you can own, it surely is ultra-portable and quite nice nonetheless.

Designer: Exercising Ingenuity

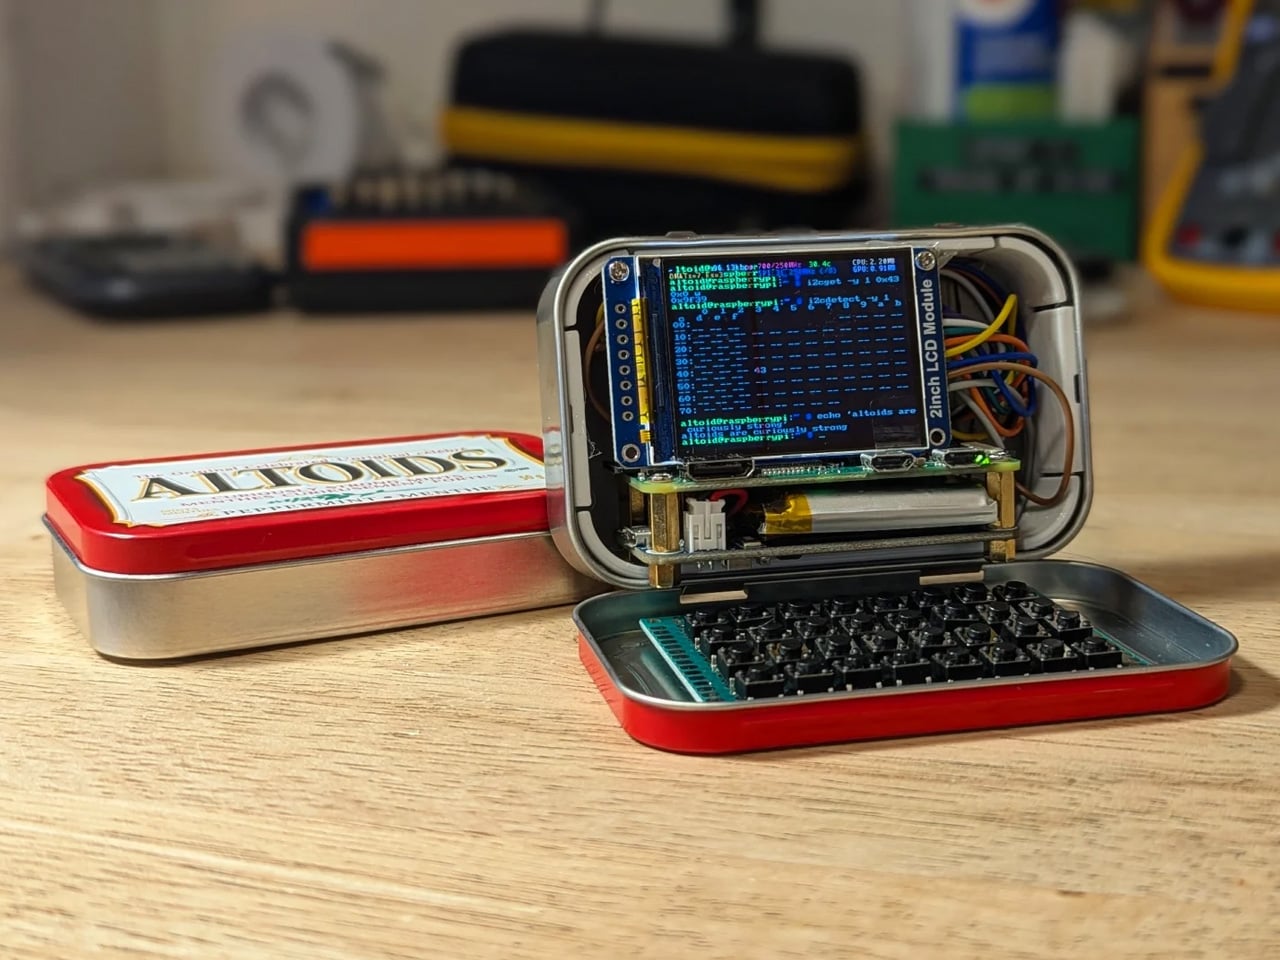
Normally, Cyberdesks are built inside ammo cans, rugged Pelican cases, or anything that has a boxy form factor. The machines piqued in popularity during the 1980s after the science fiction novel Neuromancer. Altoid tins have all these attributes, just the smaller size makes them a very odd proposition in the Cyberdesk world. That said, he set out anyway on putting together the hardware. For the CPU, he used the Raspberry Pi Zero W he had lying around, and a 2-inch LCD from another unfinished project. The power comes from a 750mAh lithium-ion polymer battery.

The real challenge was to find the tiny mechanical keyboard and fit it inside the small space. According to him, this was the most enjoyable part of the project, even though the video suggests it was a difficult one. It required learning how to construct the diode matrix for configuring the input, along with the assembling and soldering methodology of each of the keys. The final step here involved painting the keys with a white ink pen. Once this bit was taken care of, the DIY headed into the moderate level difficulty (at least for us). The next step was to create a 3D-printed frame to keep all the components inside the tin in place.

Wiring had to be kept to a minimum, and soldering of other components had to be done efficiently, as space was a premium. As a last step to make more room for components like the UPS HAT board and the display, the original hinge was extended with another Altoids tin hinge for a makeshift, slightly bigger replacement. Once all the hardware components were secured properly inside the tin, it was just a matter of running the system using the software. To make the thing look and feel like a vintage desktop computer, the DIYer painted the front panel beige.

The post This pocket-sized cyberdesk built inside Altoids Tin is a portable workstation for geeks first appeared on Yanko Design.

DIY Raspberry Pi Camera Turns Your Photos into Glitch Art, and the Results Are Incredible

Par : Sarang Sheth
10 mai 2026 à 15:20

You currently have two options if you want to apply effects and filters to your photos: use an app that will inevitably harvest your data for training their AI model (we’re watching you, Instagram), or actually edit your photos manually, which requires time, software subscriptions, and the patience of a saint. Reddit user sharkbiscuit101 unlocked a third option, and it involves a Raspberry Pi 4, a rotary encoder, a gamepad, and a frankly unreasonable amount of ingenuity. The build produces glitch photography on the pixel level, in real time, through a custom script running entirely offline on hardware you can source yourself. No cloud upload, no terms of service, and crucially, no algorithm deciding what your creative output should look like. This is your camera, running your parameters, answering to nobody.

The camera itself works exactly how you’d want a dedicated glitch tool to work. Hit the shutter button, but before you do, twist the rotary dial to control how aggressively the Pi’s script mangles the RGB channels of whatever you’re pointing at. The result lands somewhere between a corrupted memory card and a fever dream, and the specific character of the glitch is entirely yours to tune through on-screen sliders before you commit to a shot. A small preview screen shows you the live feed so you can watch the image fall apart in real time, which is exactly as satisfying as it sounds. The rotary encoder also handles preset saves, so when you find a combination of settings that produces something genuinely beautiful and broken, you can lock it in and recall it later.

Designer: sharkbiscuit101

The physical design is wonderfully unashamed about what it is. A transparent acrylic chassis sandwich holds the Pi 4 and an Arducam module at the center, with a small HDMI screen on the front face showing the preview, and a Adafruit gamepad breakout board mounted beside it for navigation. A Sharge battery pack, the rectangular kind you’d find at Amazon, clamps to the side and handles power duties. Since the Pi 4 has no dedicated power button, the battery’s own switch becomes the on-off toggle, which is one of those practical workarounds that somehow feels more elegant than a purpose-built solution. Brass standoffs hold the whole sandwich together, giving the build a satisfying mechanical solidity that belies its component-bin origins.

Sharkbiscuit101 hasn’t released the script or component list publicly yet, though the Reddit thread is essentially one long, enthusiastic demand that they do exactly that. The sample images they’ve posted, saturated cascades of cyan and red over a person’s silhouette, a park scene dissolved into chromatic noise, a building rendered in kaleidoscopic symmetry, make a compelling case for why people want to replicate this. When the files do drop, expect a flood of variations, because this is precisely the kind of open-ended hardware that the maker community will run with in seventeen different directions simultaneously.

The post DIY Raspberry Pi Camera Turns Your Photos into Glitch Art, and the Results Are Incredible first appeared on Yanko Design.

This Foldable DIY Cyberdeck Has Breadboards Built In and Runs Doom

Par : JC Torres
13 mars 2026 à 13:20

Most portable computers are sealed boxes, which is exactly what makes them frustrating for anyone who wants to experiment with electronics. You can run code on a laptop, but try wiring a temperature sensor or an infrared transmitter directly to it, and you’ll realize that consumer hardware was never designed for that kind of access. A maker who goes by PickentCode got tired of that gap and built something to close it.

The CyberPlug 3.0 is the third iteration of a personal cyberdeck project, the earlier two having usability problems that sent PickentCode back to Blender to redesign. The final build packs a Raspberry Pi 4 Model B, a 4-inch IPS touchscreen, a Rii K06 mini keyboard with a built-in touchpad, and a 5,000 mAh USB-C power bank into a 3D-printed hinged body that folds flat for handheld use or props open at a desk-friendly angle.

Designer: PickentCode

What separates this from a standard Raspberry Pi build is the pair of breadboards soldered directly to the GPIO pins, seated inside the case, and accessible through a removable back panel. Connecting a sensor no longer means hunting for a separate breadboard and a tangle of jumper wires. PickentCode plugged in a temperature and humidity sensor and had it reading live data within minutes, then built an infrared setup that records remote control signals and replays them as single-button macros.

The two form factors each have a distinct locking mechanism rather than just flopping into position. In handheld mode, twin magnets pull the two halves together. In desktop mode, a metal ring on the back grabs the MagSafe-style power bank magnetically, holding the whole thing at a stable upright angle. Both the keyboard and the power bank slide out independently, and the deck keeps working on a desk without either of them.

Extensions are where the project gets more interesting. PickentCode added a PWM-controlled external fan that reads CPU temperature and adjusts speed automatically, and a small speaker module that opened the door to YouTube and older games. Doom, Half-Life, and GTA: Vice City all ran on it, better with an external setup in desktop mode, though workable in handheld after some button remapping.

PickentCode frames this plainly as a testbed for learning electronics, not a replacement for a phone or a real computer. The 3D files are free on Printables, so the main cost is filament, time, and the components. For anyone who has ever stared at a sealed laptop wishing they could just plug something into it, that framing is probably the most relatable thing about it.

The post This Foldable DIY Cyberdeck Has Breadboards Built In and Runs Doom first appeared on Yanko Design.

❌
❌